


A detailed explanation of how to configure IPv6 in FreeBSD in 2 parts is available: Pragmatic IPv6 (Part 1) and Pragmatic IPv6 (Part 2).
Enabling IPv6
Internet Protocol version 6 (IPv6) is enabled by default in FreeBSD 9.0 and later. These directions will help you enable IPv6 on earlier FreeBSD systems (IPv4 will continue to run at the same time). You must be logged in as root to make the changes. To get root type su and your root password. Warning: In FreeBSD, you must be in the wheel group to su to root.
You need to edit the file /etc/rc.conf to perform the following actions:
1. To enable IPv6, just add the line:
ipv6_enable=”YES”
You can choose to manually or automatically configure the IPv6 settings. The latter method uses the daemon rtsol to autoconfigure your interface on boot; to use it, you do not need to add any other lines.
To manually assign an IP address, you need to determine the name of your network interface using the ifconfig command. Typical interfaces are em0 or fxp0.
2. To add the IPv6 address 2001:471:1f11:251:290::2093 to your fxp0 interface, add the following line:
ipv6_ifconfig_fxp0=”2001:471:1f11:251:290::2093″
3. To assign a default router of 2001:471:1f11:251:290::1 add the following line:
ipv6_defaultrouter=”2001:471:1f11:251::1″
Reboot your machine, and IPv6 should be ready to go. To verify that IPv6 is working, try
$ ping6 -n ipv6.test-ipv6.com
4. Privacy extensions are not enabled by default. Execute the following
sysctl net.inet6.ip6.use_tempaddr=1
to enable their use on all interfaces. To prefer their use over other address types, execute the following
sysctl net.inet6.ip6.prefer_tempaddr=1
Another useful IPv6 command on FreeBSD is traceroute6. You can also use a v6-capable browser like mozilla or epiphany to reach IPv6 sites such as ipv6.test-ipv6.com.
To manually resolve an IPv6 address:
$ nslookup
> set type=AAAA
> ipv6.test-ipv6.com
For more information, please visit
https://www.freebsd.org/handbook/index.html
and look at the IPv6 section of the Advanced Networking chapter.
Also, for information about FreeBSD on an IPv6-only network visit
https://people.freebsd.org/~rodrigc/doc/data/ipv6/ipv6only.html
Disabling IPv6
The first version to contain IPv6 support was FreeBSD 4. In FreeBSD releases 9.0 and later, IPv6 is enabled by default. To disable it,
1. Edit the file /etc/rc.conf
2. Add the following line to the file
ipv6_network_interfaces="none" # Default is auto
(If other ipv6_network_interfaces lines exist in the file, delete them)
3. Reboot (or, restart the rc.d script)
In FreeBSD releases up to 8.x, IPv6 was disabled by default. To disable it after it has been enabled,
1. Edit the file /etc/rc.conf
2. Delete the ipv6_enable line or else edit it to read
ipv6_enable="NO" # Default is NO
3. Reboot (or, restart the rc.d script)
Note: A 2022 tutorial on the many aspects of IPv6 can be found in this All Things TECH IPv6 on Linux article.
The Debian Wiki has a web page devoted to IPv6 called the Debian IPv6 Project.
The Ubuntu Wiki has a web page devoted to IPv6 called simply IPv6.
Enabling IPv6
The ipv6 module is loaded by default in Debian 2.6.x and later and in Ubuntu 6.10 and later, so steps (1) and (2) below should not be necessary on these systems. IPv4 will continue to run. You must be logged in as root to make these changes.
The following steps describe the changes needed to enable Internet Protocol version 6 (IPv6) on Debian Linux. Ubuntu is based very closely on Debian, so these directions should work as well for Ubuntu systems, but have not been tested.
If you depend on iptables for securing the system make sure to appropriately apply ip6tables rules. The Enabling IPv6 in ip6tables and other Linux-based Firewalls article in the Security section describes the differences between iptables and ip6tables.
To see if you already have an IPv6 address type the command:
ifconfig.
To get to root on Ubuntu type the command;
sudu -H -s
and enter your user password. To get to root on Debian type the command:
su
and enter your root password.
1) To make sure you have the proper ipv6 support packages installed, type the command:
apt-get install iproute iputils-ping iputils-tracepath
For documentation on using the apt-get command, type the command:
man 8 apt-get.
Other ipv6 related packages can be found by typing the command:
apt-cache search ipv6.
2) To confirm that the ipv6 kernel module is loaded, type the command:
lsmod |grep ipv6.
2.a) If the module is not loaded, type the command:
modprobe ipv6.
2.b) Add ipv6 to /etc/modules to have the module load at boot time. For documentation on this file’s format, type the command:
man 5 modules.
3) By default, an IPv6 address is configured for all interfaces in Debian using Stateless Address Autoconfiguration (SLAAC). Prior to version 12.04 of Ubuntu, SLAAC was also the default. In version 12.04, privacy addressing became the default for all interfaces.
The default IPv6 address(es) for a system’s network interface(s) can be changed to:
(1) manually assigned (static addressing),
(2) dynamically calculated each time the system boots or reboots (privacy addressing), or
(3) reassigned at any time during system operation using Dynamic Host Configuration Protocol (DHCPv6) (dynamic addressing).
To manually assign static IPv6 address(es), see step 3.a below.
To manually enable privacy addressing, see step 3.b below.
To configure the use of dynamic addressing, see step 3.c below.
3.a) To configure static addressing on a specific interface, edit the /etc/network/interfaces file. Type the command
man 5 interfaces
for documentation on this file’s format. For example:
iface eth0 inet6 static
address 2001:480:230::42
netmask 64
gateway 2001:480:230::1
Proceed to step 4.
3.b) To enable privacy addressing for all network interfaces, add this line to /etc/sysctl.conf
net.ipv6.conf.all.use_tempaddr=2
and restart the system. Privacy addressing will remain in effect on all interfaces until the next system reboot or restart after this line has been changed or removed. Depending on your system release level, the above command may not work properly for network interfaces attached after the initial boot process (USB Network cards or SD-IO and PC-CARD Network interfaces) completes. This bug will eventually be fixed. On such systems, typing the command:
sudo sysctl net.ipv6.conf.all.use_tempaddr=2
after such network interfaces are attached will temporarily enable privacy addresses on them. Again, success depends on your system release level.
To temporarily enable privacy addressing for a specific network interface (for example, ‘eth0’) until the next system boot or reboot, type the commands:
sudo sysctl net.ipv6.conf.eth0.use_tempaddr=2
sudo /etc/init.d/networking restart
When privacy addresses are enabled, the ifconfig command will often indicate "global temporary dynamic" or "global secondary dynamic" for such addresses.
Proceed to step 4.
3.c) To enable SLAAC for a specific interface on a system where privacy addressing is the default, add this line to /etc/sysctl.conf for that network interface (for example, ‘eth0’) (or change its value if the line already exists):
net.ipv6.conf.eth0.use_tempaddr=0
and then restart the system. SLAAC will not be enabled for that interface until the next system restart. To enable SLAAC for all network interfaces on a system where privacy addressing is the default, add this line to /etc/sysctl.conf (or change its value if the line already exists):
net.ipv6.conf.all.use_tempaddr=0
and then restart the system. SLAAC will not be enabled for any network interfaces until the next system restart. The caveats about system release level mentioned in step 3.b above apply.
Proceed to step 4.
3.d) To configure dynamic addressing requires the installation and configuration of an additional package, such as dibbler. Documentation for dibbler is available here: sourceforge.net/projects/dibbler.
4) The Essential IPv6 for the Linux Systems Administrator presentation discusses additional aspects of enabling IPv6, such as routing and DNS.
5) To restart networking on all interfaces, type the command:
/etc/init.d/network restart
This may disconnect you temporarily as networking reloads. To restart networking for a specific interface, type the commands:
ifdown $IFACE
ifup $IFACE
(where $IFACE is the interface name). For documentation on using the ifdown command, type the command:
man 8 ifdown.
and for documentation on using the ifup command, type the command:
man 8 ifup.
6) To verify that IPv6 is working, type the command:
ping6 -n ipv6.test-ipv6.com
The output should be similar to this:
Pinging ipv6.test-ipv6.com [2001:470:1:18::115] with 32 bytes of data:
Reply from 2001:470:1:18::115: time=687ms
Reply from 2001:470:1:18::115: time=719ms
Reply from 2001:470:1:18::115: time=702ms
Reply from 2001:470:1:18::115: time=700ms
Notes:
The kernel will automatically assign a Scope:link address (fe80:: prefix) to your system. If an IPv6 router is advertising on your network, a Scope:Global address will be assigned if /proc/sys/net/ipv6/conf/*/accept_ra = 1. This can be configured to occur at boot time by editing the /etc/sysctl.conf file, adding the line
net.ipv6.conf.$IFACE.accept_ra = $VAL
and then rebooting, where:
$IFACE can be any interface name on your system, or ‘all’ (for every interface) or ‘default’
(default settings before interface specific settings are applied).
$VAL can be either 0 (off) or 1 (on).
Autoconfigure addresses can also be configured via /proc/sys/net/ipv6/conf/*/autoconf . Read the article
Documentation/networking/ip-sysctl.txt
in the documentation that comes with the Linux kernel source for more information on these and other kernel configuration options.
Debian has an IPv6 setup page (last updated Feb, 2013) along with an IPv6 Project Page.
Also, checkout the Linux IPv6 HOWTO website.
Disabling IPv6
In Debian/Ubuntu releases built on a 2.6.x or later Linux kernel, IPv6 is enabled by default. This includes Debian 2.6.x and later and Ubuntu 6.10 and later. IPv4 will continue to run. You must be logged in as root to make such changes. To disable IPv6,
1. Edit the file /etc/modprobe.d/aliases.
2. Find the existing line
alias net-pf-10 ipv6
and edit it so that it looks like
alias net-pf-10 off
alias ipv6 off.
3. Write the file, save it, and exit the editor.
4. Restart the system.
Note: A 2022 tutorial on the many aspects of IPv6 can be found in this All Things TECH IPv6 on Windows article.
Internet Protocol version 6 (IPv6) is enabled by default in all versions of Microsoft Windows 8 or later and Server versions released in 2013 or later. Unless explicitly disabled, IPv6 will also be enabled (or reenabled) upon upgrading to any version of Windows 8 or later or Server versions released in 2013 or later. If you want to disable IPv6, the following five methods are available.
Caution: In this February 2011 Why you should leave IPv6 alone article, Microsoft recommends that IPv6 not be completely disabled, but instead that the IPv6-tunneling interfaces be disabled.
Method 1. (Traditional method used by all Windows versions.) In the Network Connections folder of the Network and Sharing Center on the Control Panel, obtain properties on all of your connections and adapters and clear the check box next to the Internet Protocol version 6 (TCP/IPv6) component in the list under This connection uses the following items. This method can be used to disable IPv6 on each network interface and connection, but does not disable IPv6-tunneling interfaces nor the IPv6 loopback interface.
Method 2. Run PowerShell as an Administrator. Run the cmdlet
Get-NetAdapterBinding
to list all Network Adapters on the computer and the state of the ms_tcpip6 ComponentID for each Network Adapter. For each Network Adapter for which the ComponentID ms_tcpip6 shows Enabled = True, run the cmdlet
Set-NetAdapterBinding -Name “Network Adapter Name” –ComponentID ms_tcpip6 –Enabled $False
To disable IPv6 for all Network Adapters on the system with a single command, use
Set-NetAdapterBinding -Name “*” –ComponentID ms_tcpip6 –Enabled $False
An alternative cmdlet to the above command is the command
Disable-NetAdapterBinding -Name “*” –ComponentID ms_tcpip6
The netsh command line interface which was used in Windows 7 and Server 2008 to configure and manage TCP/IP configurations still exists, but Microsoft recommends that you transition to Powershell. In future updates of Windows, Microsoft may remove the netsh functionality.l
Method 3. Use either (a) the wizard or (b) follow the directions for modifying the registry in this article on the learn.microsoft.com website. (As noted in that article, after following these directions for modifying the registry, method 1 can no longer be used.)
Method 4. Search for the regedit app and Run as Administrator (older than but similar to method 3(b) above.
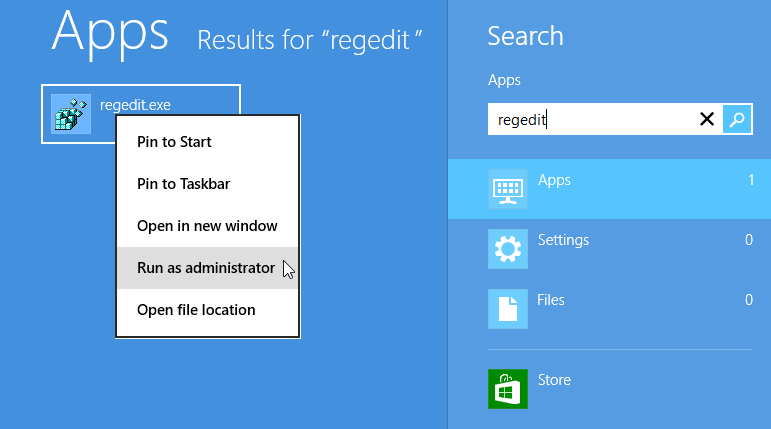
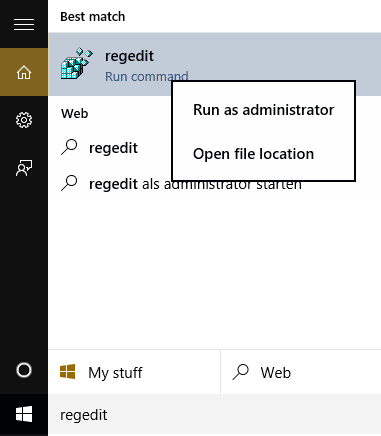
Windows 8 “regedit” search Windows 10, 11 and later "regedit" search
If it doesn’t already exist, add the following registry value (DWORD type):
HKEY_LOCAL_MACHINE\SYSTEM\CurrentControlSet\Services\Tcpip6\Parameters\DisabledComponents
DisabledComponents will be set to 0x0 by default. Set it to 0xFF to disable IPv6 on all your network interfaces, connections, and IPv6 tunneling interfaces. You must restart the computer for this registry value to take effect.
Note: In line with the Microsoft recommendation mentioned at the beginning of this article, it is suggested that DisabledComponents be set to 0xAF rather than 0xFF.
When DisabledComponents exists and a DisabledComponents bit is set, it overrides any settings established by methods 1 and 2. The DisabledComponents registry value is a bit mask that controls the following series of flags, starting with the low order bit (Bit 0):
- Bit 0 Set to 1 to disable all IPv6 tunnel interfaces, including ISATAP, 6to4, and Teredo tunnels. Default value is 0.
- Bit 1 Set to 1 to disable all 6to4-based interfaces. Default value is 0.
- Bit 2 Set to 1 to disable all ISATAP-based interfaces. Default value is 0.
- Bit 3 Set to 1 to disable all Teredo-based interfaces. Default value is 0.
- Bit 4 Set to 1 to disable IPv6 over all non-tunnel interfaces, including LAN interfaces and Point-to-Point Protocol (PPP)-based interfaces. Default value is 0.
- Bit 5 Set to 1 to modify the default prefix policy table to prefer IPv4 to IPv6 when attempting connections. Default value is 0.
- Bit 6 This bit was reserved for future use up until Windows Server 2019. Set to 1 to disable all CP-based interfaces. Default value is 0.
- Bit 7 Set to 1 to disable all IP-TPS-based interfaces. Default value is 0.
To determine the value of DisabledComponents for a specific set of bits, construct a binary number consisting of the bits and their values in their correct position and convert the resulting number to hexadecimal. For example, if you want to disable 6to4 interfaces, disable Teredo interfaces, and prefer IPv4 to IPv6, you would construct the following binary number: 00101010. When converted to hexadecimal, the value of DisabledComponents is 0x2A.
Method 5. Issue the following command line as an Administrator:
reg add hklm\system\currentcontrolset\services\tcpip6\parameters /v DisabledComponents /t REG DWORD /d 0xFF
The above registry entry should already exist. If it doesn't, create it.
Note: in line with the Microsoft recommendation mentioned at the beginning of this article, it is suggested that DisabledComponents be set to 0xBF rather than 0xFF.
These five topics describe disabling IPv6 in legacy versions of Microsoft Windows:
- Disabling IPv6 in Windows 7 and Server 2008 R2
- Disabling IPv6 in Windows Vista and Server 2008
- Disabling IPv6 in Windows XP with SP1 (or later) and Server 2003
- Disabling IPv6 in Windows XP with no Service Pack installed
- Disabling IPv6 in Windows 2000
1. Disabling IPv6 in Windows 7 and Server 2008 R2
Both Windows 7 and Server 2008 R2 had IPv6 enabled by default. If you want to disable Internet Protocol version 6 (IPv6) in Windows 7 or Server 2008 R2, the following three methods were provided by Microsoft. The 2nd and 3rd methods are also documented on the Microsoft web site (look at the Microsoft knowledge base article KB 929852 article for more details).
Caution: In this February 2011 Why you should leave IPv6 alone article, Microsoft recommends that IPv6 not be completely disabled, but instead that the IPv6-tunneling interfaces be disabled.
- Use Microsoft-provided “Fix it” scripts to disable all or selected IPv6 functions, as described by the Microsoft knowledge base article KB 929852. You must be logged on to the computer as a member of the Administrators group, or your user account must be granted permissions to edit the Windows registry.
- In the Network Connections folder, obtain properties on all of your connections and adapters and clear the check box next to the Internet Protocol version 6 (TCP/IPv6) component in the list under This connection uses the following items. This method disables IPv6 on your LAN interfaces and connections, but does not disable IPv6 on tunnel interfaces or the IPv6 loopback interface.
- Add the following registry value (DWORD type) set to 0xFF:
HKEY_LOCAL_MACHINE\SYSTEM\CurrentControlSet\Services\Tcpip6\Parameters\DisabledComponents
This method disables IPv6 on all your LAN interfaces, connections, and tunnel interfaces. You must restart the computer for this registry value to take effect. DisabledComponents is set to 0 by default.
Note: In line with the Microsoft recommendation mentioned at the beginning of this article, it is suggested that DisabledComponents be set to 0xAF rather than 0xFF.
The DisabledComponents registry value is a bit mask that controls the following series of flags, starting with the low order bit (Bit 0):
- Bit 0 Set to 1 to disable all IPv6 tunnel interfaces, including ISATAP, 6to4, and Teredo tunnels. Default value is 0.
- Bit 1 Set to 1 to disable all 6to4-based interfaces. Default value is 0.
- Bit 2 Set to 1 to disable all ISATAP-based interfaces. Default value is 0.
- Bit 3 Set to 1 to disable all Teredo-based interfaces. Default value is 0.
- Bit 4 Set to 1 to disable IPv6 over all non-tunnel interfaces, including LAN interfaces and Point-to-Point Protocol (PPP)-based interfaces. Default value is 0.
- Bit 5 Set to 1 to modify the default prefix policy table to prefer IPv4 to IPv6 when attempting connections. Default value is 0.
- Bit 6 This bit is reserved for future use in Windows Server 2019 and later. Default value is 0.
- Bit 7 Set to 1 to disable all IP-HTTPS-based interfaces. Default value is 0.
To determine the value of DisabledComponents for a specific set of bits, construct a binary number consisting of the bits and their values in their correct position and convert the resulting number to hexadecimal. For example, if you want to disable 6to4 interfaces, disable Teredo interfaces, and prefer IPv4 to IPv6, you would construct the following binary number: 00101010. When converted to hexadecimal, the value of DisabledComponents is 0×2A.
2. Disabling IPv6 in Windows Vista and Server 2008
Windows Vista and Server 2008 had IPv6 enabled by default. The methods to disable IPv6 are the same as those described in the 1. Disabling IPv6 in Windows 7 and Server 2008 R2 topic above.
Note: When using method 3 in the 1. Disabling IPv6 in Windows 7 and Server 2008 R2 topic, bits 7 and 8 are both reserved for future use. Default value is 0.
3. Disabling IPv6 in Windows XP with SP1 (or later) and Server 2003
Windows Server 2003 had IPv6 enabled by default.
For the IPv6 protocol for Windows XP with SP1 (or later) or Windows Server 2003, do the following:
- Log on to the computer with a user account that has privileges to change network configuration.
- Click Start, click Control Panel, and then double-click Network Connections.
- For each local area connection, right click the local area connection and then click Properties.
- Click Microsoft TCP/IP version 6 (for Windows XP with SP2 or later or Windows Server 2003) or Microsoft IPv6 Developer Edition (for Windows XP with SP1), and then click Uninstall.
- When prompted to confirm the removal of the Microsoft IPv6 Developer Edition or Microsoft TCP/IP version 6 protocol, click OK.
Alternately, from the Windows XP or Windows Server 2003 desktop, click Start, point to Programs, point to Accessories, and then click Command Prompt. At the command prompt, type netsh interface ipv6 uninstall.
4. Disabling IPv6 in Windows XP with no Service Packs installed
To remove the IPv6 protocol for Windows XP with no Service Packs installed, do the following:
- Log on to the computer with a user account that has local administrator privileges.
- From the Windows XP desktop, click Start, point to Programs, point to Accessories, and then click Command Prompt.
- At the command prompt, type ipv6 uninstall
5. Disabling IPv6 in Windows 2000
To uninstall the Microsoft IPv6 Technology Preview for Windows 2000 with SP4 and restore the files that were replaced:
- Log on to the Windows 2000 computer with a user account that has local administrator privileges.
- From the Windows 2000 desktop, click Start, point to Settings, and then click Control Panel. In the Control Panel dialog box, double-click Add/Remove Programs.
- In the Add/Remove Programs dialog box, click IPv6 Technology Preview refresh in the list of installed programs, then click Remove.
- When prompted whether you are sure you want to remove the hotfix from your computer, click Yes.
Note: A 2022 tutorial on the many aspects of IPv6 can be found in this All Things TECH IPv6 on Mac OS article.
In Apple macOS (all versions), OS X (all versions), and Mac OS X (versions 10.3 Panther and later), Internet Protocol version 6 (IPv6) is on by default. It was also supported in Mac OS X versions 10.0 Cheetah, 10.1 Puma, and 10.2 Jaguar, but turned off by default.
This article describes how to turn off IPv6 using Network settings or the command line.
If neither the Network settings nor the command line as described in the above article work, another command to turn off IPv6 on all network interfaces is
/usr/sbin/ip6 -x
If either of the following variables are defined in /etc/sysctl.conf, delete them (no matter what value they have):
net.inet6.ip6.use_tempaddr
net.inet6.ip6.temppltime.