
Introduction
This two part article focuses on network management procedures and practices recommended for use by IPv6 network administrators and security managers:
Part 1: IPv6 Network Management Recommendations, and
Part 2: Changing Perspectives on the Transition to IPv6.
(Note: A best practices document describes actions or practices that are known to produce good outcomes when followed.)
When changing the management infrastructure of any network that currently supports Internet Protocol version 4 (IPv4)-only to either:
(1) dual-stack (IPv4 and IPv6 are both supported),
(2) IPv6-only-preferred (existing IPv4-only and dual-stack nodes on a local area network both continue to be supported but all new and updated nodes on the network will be IPv6-only, sometimes referred to as IPv6-mostly access), or
(3) IPv6-only,
there are no easy or quick solutions. The books on network management listed in part 3 of the IPv6 Training Information document referenced in the IPv6 Training and Learning article under the Deployment section provide additional information.
Network management and network security in both environments have been the subject of numerous Internet Engineering Task Force (IETF) Request For Comments (RFC) documents, including:
- RFC 4057 IPv6 Enterprise Network Scenarios,
- RFC 4942 IPv6 Transition/Coexistence Security Considerations,
- RFC 6418 Multiple Interfaces and Provisioning Domains Problem Statement,
- RFC 6632 An Overview of the IETF Network Management Standards,
- IETF draft document Monitoring Dual Stack/IPv6-only Networks and Services,
- RFC 7368 IPv6 Home Networking Architecture Principles,
- RFC 7381 Enterprise IPv6 Deployment Guidelines,
- RFC 7556 Multiple Provisioning Domain Architecture,
- RFC 8043 Source-Address-Dependent Routing and Source Address Selection for IPv6 Hosts,
- RFC 8801 Discovering Provisioning Domain Names and Data,
- RFC 8925 IPv6-Only Preferred Option for DHCPv4,
- RFC 9099 Operational Security Considerations for IPv6 Networks (which complements RFC 4942), and
- RFC 9288 Recommendations on the Filtering of IPv6 Packets Containing IPv6 Extension Headers at Transit Borders.
Part 1: IPv6 Network Management Recommendations
General recommendations, specific examples, and product information about network management for those deploying IPv6 in an existing IPv4-only network or transitioning to an IPv6-only network are provided by the following articles, reports, papers, seminars, tutorials, and presentations:
- This comprehensive IPv6 Network Management tutorial presented at the Asia Pacific Regional Internet Conference on Operational Technologies (APRICOT) covers both the concepts and best practices of network management and network monitoring for IPv6 networks. It includes extensive examples of specific software use and reference bibliographies.
- This IPv6 Network Management Cookbook prepared by the European 6NET project and this later IPv6 Network Management overview presented by the European 6Deploy project cover concepts and best practices of network management, plus some tools developed by the 6NET project. (The European 6NET project completed Jun 2005, followed by the 6DISS project which completed Sept 2007; followed by 6DEPLOY and 6DEPLOY-2 (www.6deploy.eu) which completed Feb 2013. A more recent European IPv6 project was Governments Enabled with IPv6 (GEN6) which completed May 2015. Deliverables and Presentations under the Publications tab of the GEN6 website provide additional material. The next European IPv6 project was IPv6 Framework for European Governments which completed in 2018. Then came the European Union Internet Standards Deployment Monitoring project.)
- This article describes how to use SDN to increase the security of Stateless Address Autoconfiguration (SLAAC) and Neighbor Discovery Protocol (NDP) interactions among computers on a Local Area Network.
- Some IPv6-specific network management techniques and tools are described in this Are you neglecting IPv6 network management? article.
- This Mutually Agreed Norms for Routing Security (MANRS) Initiative for wide-area network operators and this Best Current Operational Practices (BCOP) Implementation Guide for stub networks and small providers.
- This BCOP on Minimum Security Requirements for Customer Premises Equipment (CPE) Acquisition document provides guidelines when recommending CPE to end-users.
- An extensive list of Network Monitoring Tools (over 500 listings) is maintained by the Stanford Linear Accelerator Center (SLAC) National Accelerator Laboratory. Not all these tools specifically state support for IPv6.
- Using the framework of the International Standards Organization (ISO) Fault, Configuration, Accounting, Performance, Security (FCAPS) model for network management, this NetworkWorld article informally discusses software for IPv6 network management.
- Using the use case methodology of systems analysis, this article informally discusses employing several performance management use cases to improve network performance.
- This Cisco Systems, Inc. white paper offers recommendations for non-IP specific network management, while this white paper offers recommendations for enabling network management via IPv6 transport on a network infrastructure that was previously IPv4-only.
- This Federal IPv6 Techtorial presentation hosted by BrightTALK provides a snapshot of network management products and best practices as of May, 2012.
- This IPv6 Deployment In Local Area Networks by Samenwerkende Universitaire Reken Faciliteiten Network (SURFNet), April, 2011, provides IPv6 configuration management guidance from the network level down to the individual device level.
- This article lists and compares the features of many NMS.
- In 2002, the then European 6NET project published this IPv6 Network Management Cookbook. Its recommendations are still valid for any IPv6 network management infrastructure. (See item 2 above for a summary of subsequent European IPv6 deployment project evolution.)
Part 2: Changing Perspectives on the Transition to IPv6
It is interesting to observe how the perspective on network management has changed over time during the ongoing transition from IPv4-only to IPv6 networking, as shown by the following (in reverse chronological order):
2023-2024 Perspective on the Transition to IPv6
A series of articles from the American Registry for Internet numbers (ARIN) on the subject of The Business Case for IPv6:
The IPv6-only Enterprise
Crossing the IPv6 Chasm
Operationalizing IPv6: From Theoretical to Practical
Internet vs Intranets.
2020 Perspective on the Transition to IPv6
This statement is from a policy memorandum (available here) from the Office of the Federal Chief Information Officer:
This memorandum communicates the requirements for completing the operational deployment of IPv6 across all Federal information systems and services, and helps agencies overcome barriers that impede them from migrating to IPv6-only network environments. The strategic intent is for the Federal government to deliver its information services, operate its networks, and access the services of others using only IPv6. … agencies shall: complete the upgrade of public/external facing servers and services (e.g., web, email, DNS, and ISP services) and internal client applications that communicate with public Internet services and supporting enterprise networks to operationally use native IPv6.
2016 Perspective on the Transition to IPv6
When readdressing a network that is already dual-stack or IPv6-only, a new type of challenge arises for network administrators and managers. This article on The Headache of IPv6 Readdressing discusses such a challenge.
2014 Perspective on the Transition to IPv6
As the IETF noted in this reality check in RFC 7149 Software-Defined Networking (SDN): A Perspective from within a Service Provider Environment:
The networking ecosystem has become awfully complex and highly demanding in terms of robustness, performance, scalability, flexibility, agility, etc. This means, in particular, that service providers and network operators must deal with such complexity and operate networking infrastructures that can evolve easily, remain scalable, guarantee robustness and availability, and are resilient to denial-of-service attacks.
2012 Perspective on the Transition to IPv6
These recommendations were provided by the Planning Guide/Roadmap Toward IPv6 Adoption within the US Government, July, 2012 memorandum. While the policies contained in that memorandum are no longer in effect (the memorandum was rescinded Aug, 2018 by Office of Management and Budget (OMB) Memorandum M-18-23 Shifting From Low-Value to High-Value Work), its recommendations remain valid.
IPv4-based network management systems (NMS) and fault tracing tools must undergo significant change to properly manage IPv6 networks. These would include both equipment and component managers as well as managers of managers (MoM) systems.
Replacing a non-conforming NMS is much more difficult than replacing other hardware or software as it tightly integrates with device software and hardware ports. Testing of all types and configuration of devices should be completed prior to system cutover and turn-up.
2007 Perspective on the Transition to IPv6
These observations in RFC 4942 by the IETF Network Working Group for IPv6 network management are valid for dual-stack network management as well as for network security:
It is important to understand that deployments are unlikely to be replacing IPv4 with IPv6 (in the short term), but rather will be adding IPv6 to be operated in parallel with IPv4 over a considerable period, so that security issues with transition mechanisms and dual stack networks will be of ongoing concern. This extended transition and coexistence period stems primarily from the scale of the current IPv4 network. It is unreasonable to expect that the many millions of IPv4 nodes will be converted overnight. It is more likely that it will take two or three capital equipment replacement cycles (between nine and 15 years) for IPv6 capabilities to spread through the network, and many services will remain available over IPv4 only for a significant period whilst others will be offered either just on IPv6 or on both protocols.
The Network Management section provide a wide variety of information for individuals and organizations interested in benefitting from the experience of others in planning for Internet Protocol version 6 (IPv6) deployment on and designing, operating, and managing both dual-stack (IPv6 and IPv4) and IPv6-only networks. The Wide-Area Network Deployment article is of particular interest to large enterprises, Internet Service Providers (ISP), Federal government departments and agencies, and academic institutions. In addition to the articles in this section, smaller organizations with a single geographic location may be interested in the way other small organizations have deployed dual-stack networks as described in the references provided by the Smaller Organizations' Process category of the Overview of Process article in the Deployment section.
PHP (Personal Home Page which later became PHP: Hypertext Preprocessor) is a server-side scripting language designed for web development which can also be used as a general-purpose programming language. The PHP language evolved since its creation in 1994 without a written formal specification (up until 2014). Internet Protocol version 6 (IPv6) support in PHP was added along the way, so verify your PHP server was built without the --disable-ipv6 option.
This article describes 25 PHP security best practices for Linux system administrators. A best practices document describes actions or practices that are known to produce good outcomes when followed.
The extensions listed below can be used to add support for IPv6 to PHP programs for specific functions. These are only a few of those available. Many more extensions (over 2,000) are documented on the www.php.net website. Just go to that website, enter “ipv6” in the "Search " box in the upper right hand corner, and click on the pop-up Search php.net for ipv6 that appears just below the "Search " box. Even more can be found using a web search engine.
| Developer | Name or Title | Comments or Additional Information | Related Website |
|---|---|---|---|
| 6 Deploy | Implementing IPv6 Applications | PHP, C, Perl, Java programs | http://www.6deploy.eu/workshops/20100621_athens/5%20IPv6%20Software%20Development.pdf |
| CodeIgniter | CodeIgniter | PHP framework | https://www.codeigniter.com |
| DREN | IPv6 and PTR records | formatting .IP6.ARPA records | IPv6 and PTR Records |
| Fix6 | PHP and IPv6 Addresses | Connecting to and listening for IPv6 addresses | https://www.fix6.net/archives/2009/04/24/php-and-ipv6/ |
| GITHUB | PHP IPv6 Tools | Validate IPv6 addresses, subnets, and EUI64 | https://github.com/dsp/v6tools |
| High on PHP | 5 Tips for Working with IPv6 in PHP | http://www.highonphp.com/5-tips-for-working-with-ipv6-in-php | |
| Jeremy Kendall | php-domain-parser | https://github.com/jeremykendall/php-domain-parser | |
| Packagist | PHP Composer packages | 30+ IPv6 packages | https://packagist.org/search/?q=ipv6 |
| Ray Soucy | IPv6 Address Functions | http://www.soucy.org/project/inet6 | |
| Rino Nucarda | Introduction to IPv6 Programming | PHP, C, Perl, Java programs | https://twiki.cern.ch/twiki/pub/EGEE/IPv6FollowUp/Introduction_to_IPv6_programming_C_Java_PHP_perl.pdf |
Multicast was supported on Internet Protocol version 4 (IPv4) networks, but was never widely deployed because of architectural, management and security limitations. Multicast support on IPv6 networks overcame these limitations and is more widely deployed. This article provides information about deploying and configuring IPv6 multicast on internets.
This article is organized into 4 parts:
- Review basic multicast terminology, addressing, and configuration
- Infrastructure applications enabled by IPv6 multicast
- Reference documents for multicast node configuration
- Multicast troubleshooting
1. Review
This article explains basic multicasting concepts and terminology and compares multicast with broadcast and anycast. This article describes the multicast address structure. This presentation further explains multicast terminology, describes multicast addressing and discusses issues to consider when configuring multicast source (root) nodes, receiver (leaf) nodes, and intermediate nodes (routers) populating a multicast distribution tree (MDT). Internet Engineering Task Force (IETF) Request for Comments (RFC) 6308 provides an overview of the Multicast Addressing Architecture and RFC 7371 provides an update to RFC 6308.
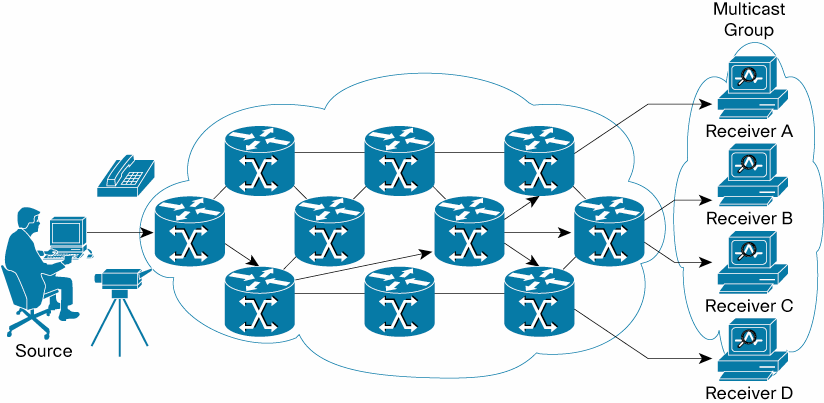
Example of a Multicast Distribution Tree
An MDT is an arbitrary group of receivers that have expressed an interest in receiving a data stream from a particular source. This presentation describes the various types of multicast groups, multicast address formats, and the dynamics of joining, leaving, reporting, and querying an MDT. This article describes a deployment of IPv6 multicast in conjunction with MultiProtocol Label Switching (MPLS) Virtual Private Networks (VPNs). This presentation describes a deployment of IPv6 multicast in conjunction with Internet Protocol Security (IPsec). This article discusses the use of IPv6 multicast with Internet Control Message Protocol for IPv6 (ICMPv6) for secure autoconfiguration. This series of articles discuss the use of IPv6 multicast with ICMPv6 for neighbor discovery (the articles are listed in reverse order). In the Security section of the IPv6 Knowledge Base, this article discusses neighbor discovery attacks and this article includes a discussion of neighbor discovery attack mitigations.
For additional details about and limitations when using IPv6 multicast with IPsec, see paragraph 5.3.3 of the National Institute of Standards and Technology Special Publication 800-119, Guidelines for the Secure Deployment of IPv6.
2. Infrastructure applications
Since its earliest deployment on IPv6 networks, multicast has been recognized as an effective technique for video conferencing and content distribution (including by commercial radio and television networks). This presentation shows how IPv6 multicast can simplify the configuration and management of infrastructure applications such as Dynamic Host Configuration Protocol (DHCP), X Display Manager Control Protocol (XDMCP), Network Time Protocol (NTP), as well as less obvious infrastructure applications like Domain Name Service (DNS) protocol [not to be confused with Apple’s Bonjour a.k.a. multicast Domain Name System (mDNS)]. IPv6 multicast can even be used to install an operating system image across multiple computers in parallel, as described in this article. Additional infrastructure applications enabled by IPv6 multicast are mentioned in the Deployment section of this IP Multicast article.
3. Reference documents
The configuration of computer operating systems as receivers to discover or join an MDT were described in the articles and presentations referenced in part 1 above. The details of configuring various router operating systems as intermediate nodes on an MDT appear below:
- Nokia OS
- Extreme Networks NetIron IPv6 Multicast Configuration
- Cisco IOS
- Juniper JUNOS
Selected additional references appear below:
- Internet Assigned Numbers Authority (IANA) IPv6 Multicast Address Space Registry
- Microsoft Windows sockets
- Oracle Solaris (in the IPv6 Multicast Addresses in Depth section)
- java
4. Multicast troubleshooting
Basic troubleshooting tools and techniques are described in this presentation and in paragraphs 6.14 and 6.15 of Nippon Telegraph and Telephone (NTT) Information Sharing Platform Laboratories Deploying IPv6: Problems and Solutions. More advanced troubleshooting techniques with an emphasis on Protocol Independent Multicast Sparse Mode (PIM-SM) routing are described in this article. This article describes troubleshooting techniques for several multicast routing modes.
On the global Internet level, this article provides information on enabling Domain Name System (DNS), Top Level Domain (TLD) and root zone nameservers, and this article provides information on testing them to verify correct operation. This article provides information on testing recursive nameservers. This article describes some security enhancements for DNS that were developed in 2023 while this article describes some of the risks associated with not deploying such enhancements.
The article DNS Considerations for IPv6 on the Internet Society (ISOC) website highlights changes to the local DNS infrastructure that should be made as part of any IPv6 deployment to ensure that it will be successful.
Documentation for configuring multiple local nameserver/operating system combinations are available, including the Berkeley Internet Name Daemon (BIND) supported by the Internet Systems Consortium (ISC) to run on multiple platforms and the Name Server Daemon (NSD) supported by the NLnet Labs.
Reference Information
The following information provides configuration details based on an old article about enabling IPv6 on BIND for GNU/Linux (circa 2010). Warning: Do NOT attempt to access the bind.com website currently on the Internet.
DNS server setup on GNU/Linux
This document contains some DNS theory, as well as configuration guidelines on GNU/Linux and OpenBSD, using two different DNS servers (diversity is always good :-): the well-known BIND from ISC, and a much lighter, authoritative only server, NSD (for more information on the difference between these two servers, read on).
As usual, you might want to check the relevant Internet Engineering Task Force (IETF) Request for Comments (RFCs) for more information on the subject, starting with RFC 1034 and RFC 1035. What we'll do is go into some configuration details using these two DNS servers. The chosen DNS architecture shows a wide range of DNS possibilities, including subzones, IPv6 name service, master/slave configuration, authoritative-only nameservers, BIND views, and TSIG usage.
DNS configuration and operation
I'll assume here that you have at least basic knowledge about DNS resolution, zone files, root servers etc. If you don't, you might want to check an introduction to DNS before reading this section. There is plenty of good introductory material on the Web -- as always, Wikipedia and Google are your friends here. I will also assume that you have a basic understanding of TCP/IP networking.
So. Let's begin, then.
DNS setup overview
First I'll present a general DNS setup for the example.org site -- it is *not* the simplest setup, and should not be seen as an example for your site, unless you understand why it has been setup that way (yes, not all of this was necessary ;-) -- but it shows a wide range of what is possible with today's DNS servers, and you might even learn some things, who knows?
OK then let's present the general DNS organisation at this site: the whole site is on a common DSL line, with one routed IPv4 address, and a generous /64 IPv6 block. The internal network is divided into a LAN (let's say 192.168.1.0/24) and a DMZ (192.168.2.0/24). There are some servers on the DMZ, which are directly reachable from the outside through IPv6, but need some tweaking (DNAT/Port forwarding) to be reachable using IPv4. This is shown on the schema below:
       +---+
       |ISP|
       +---+
         |       DSL access
         +---------------+
                         |
                     +---------+
                     |router/gw|
                     +---------+
             LAN       |     |               DMZ
     +-----------------+     +-----------+------------+
     |                                   |           |
 +-------+                         +----------+ +----------+
 |lanHost|                         |DNS server| |Web server|
 +-------+                         +----------+ +----------+
Given this topology, the site owner wants several things:
- Every host in the site should have a name belonging to the example.org domain,
- Host names which resolve to RFC 1937 addresses should not leak to the outside,
- Internal hosts should be able to resolve internal (RFC 1937) IPv4 domains, external IPv4 domains, and IPv6 domains, and DNS replies should be cached for faster operation,
- DNS servers reachable from the outside should support minimum workload and exposure,
- Every host name which resolves to a global IPv6 address should be visible to the outside, and
- If zone transfers are necessary, they should be authenticated.
To achieve this, the network administrator at the site has the following rationale (which is of course only one possibility, but a quite elegant one I think ;-):
- As some nodes will be multi-homed and as all will be dual-stacked, create several subdomains, so as to give each physical machine a unique host name:
- example.com will contain the host name assigned to the routable IPv4 address, corresponding CNAMES for the servers, and the IPv6 address of the gateway, if any,
- dmz.example.com will contain internal IPv4 addresses of the DMZ nodes, as well as their global IPv6 addresses,
- lan.example.com will contain internal IPv4 addresses of the LAN nodes, as well as their global IPv6 addresses,
- Considering that IPv4 addresses in dmz.example.com and lan.example.com must not leak to the outside, the master DNS server for these zones will be kept on the DMZ and will not be reachable from the outside,
- As we want DNS replies to be cached, we need a caching name server, which could be implemented in the master for example.com, the master for the subzones, or in a third DNS server. As this is a small site, having three name servers to maintain is overkill, so only the two first possibilities remain,
- To minimize workload and exposure of the reachable DNS server, the site administrators decide that it will be an authoritative-only nameserver, i.e. that it won't resolve anything. This leaves us with only one choice for the caching nameserver,
- If every global IPv6 address is to be registered in the DNS and visible from the outside, then the globally reachable name server will have to be a slave for dmz.example.com and lan.example.com. As we want to ensure that the internal IPv4 addresses do not leak, we will use a split DNS setup with BIND's views. Furthermore, some CNAMEs in the parent domains will likely point to different RRs depending on the querying host (internal or external), so we'll have our internal name server be the master for example.com too, and transfer this zone to the external server, and
- Zone transfers will be necessary between our two name servers at least, so we'll implement TSIG (see RFC 8945).
Now, some of you might think that this setup is overkill, and they probably would be right. A single BIND instance would be sufficient to accomplish all these tasks, but this would mean having a globally reachable, caching, resolving, and authoritative instance of BIND implementing views running on the gateway, which the site administrators are not so keen about. So let's examine the details of this setup.
Setting up the internal name server -- BIND 9
Considering the requirements above, the internal name server will have to be feature-rich (caching, resolving, authoritative) and be capable of implementing a split DNS setup. This does narrow down the choice quite a bit, and as it is always nice to read a classic again, the site administrators choose BIND 9 for this task. We won't cover installation of the server here, as plenty of documentation already exists on the subject (you might want to check the DNS HOWTO and the Chroot BIND HOWTO). The target OS is irrelevant, as BIND runs on every Unix-style OS I'm aware of.
Once the server is installed, we need to achieve the following tasks:
- write the zone files for example.com and associated subzones;
- configure a "resolving" view for the internal nodes;
- configure a view for AXFR from the external DNS server -- this view will have to use separate zone files, as RFC 1918 IP addresses should not leak.
Writing the zone files
Actually, we will have to do a bit more work than simply writing a zone file, as we might want to transmit a separate zone definition for the external name server. To handle this without hassle, I wrote a makefile which will generate the necessary zone files from a single input file, updating the serial # and generating a reverse zone file en passant. Before presenting an example input file, some notes about additional syntax:
- Lines beginning with ";-- " represent processing directives, roughly dividing your zone file in three sections:
- everything from SOF (start of file) to REV (start of "reversable" zone data) will be included almost verbatim in every output file -- what I mean by almost is that the selectors (see below) are still processed. This section typically contains the SOA and NS RRs;
- the section contained within REV/NOREV is data that is relevant for inclusion in a reverse zone. This includes for example all of your A or AAAA records, which will be processed by the Makefile to produce the corresponding PTRs in the reverse zone. For convenience, the CNAMES in this section are ignored when generating the reverse zonefile;
- the third section, between NOREV and EOF, is completely ignored when computing the reverse zone data. For example, it could contain CNAMEs or MX records.
- The DORIGIN, R4ORIGIN and R6ORIGIN tokens allow the scripts to generate an $ORIGIN directive for BIND, as well as to specify the FQDN of every node pointed to by a PTR record -- this is not strictly necessary, but adds some clarity (I think) to the generated zones.
- Lines ending with the "; Internal" and "; External" selectors are specific to an internal or external zone -- we'll see an example of this.
OK, now that you master the (fairly basic) syntax, let's write a example file -- we need some directives, a SOA section, and the relevant RRs:
; -- SOF --
;
; Zone file for lan.example.com
;
; Owner TTL Type Class RDATA
; default TTL -- 1 day
$TTL 3600
@ 3600 IN SOA ns.example.com. example.com.
2006012910 ; Serial
3600 ; Refresh
1800 ; Retry
1209600 ; Expire
3600 ; Minimum / Negative Cache TTL
)
;
; Name servers
;
@ 3600 IN NS host1.dmz.example.com. ; Internal
@ 3600 IN NS gw.example.com. ; External
; -- REV --
;
; Local
; -- DORIGIN: lan.example.com.
; -- R4ORIGIN: 1.168.192.in-addr.arpa.
; -- R6ORIGIN: 0.1.2.3.4.5.6.7.8.9.a.b.c.d.e.f.ip6.arpa.
host3 3600 IN A 192.168.1.3 ; Internal
host3 3600 IN AAAA fedc:ba98:7654:3210::3 ; External
; -- NOREV --
;
;
@ 3600 IN MX 0 localhost. ; Internal
@ 3600 IN MX 0 gw.example.com. ; External
; -- EOF --
Now, once you have written your input file (let's say it's named "lan.example.com.edit"), running 'make lan.example.com' will generate six zone files for BIND to use: the internal and external forward zone files (named after your domain, respectively suffixed with '.intzone' and '.extzone'), the internal and external IPv4 reverse zone files (suffixed with '.intrev4' and '.extrev4'), and finally the internal and external IPv6 reverse zone files ('.intrev6' and '.extrev6'). If you don't need some of these files, for example if you don't have any IPv6 nodes, then simply edit the Makefile, or don't declare them into your named.conf. Note that you'll need GNU make, so if you're not running Linux, you might have more luck typing 'gmake' when you read 'make' ;-)
Configuring the "resolving" view
OK, now we have a handful of zone files, and want to integrate them into BIND. To do this, we'll configure some "views" on the name server. Views are a powerful feature of BIND 9.x which enable a so-called "split-DNS" setup, where served data depends on the client requesting it. We first want to configure the DNS for our internal clients, so that's what we'll do here. The relevant section in named.conf is presented below, with additional comments.
### This is for local clients
view "internal" IN {
        ## Define which clients match this view
        # Here we want the source to be 'local' (internal) hosts,
        # and the destination be the name server itself
       match-clients { local; };
       match-destinations { me; };
       # This prevents AXFR requests from being matched by this view,
        # which is vital for a working setup (see the external view for more info)
       match-recursive-only yes;
       ## Access control
        # This allows us to further restrict access to zone data contained in this view
       allow-query { local; };
       allow-recursion { local; };
       allow-transfer { none; };
       ## Now define our master zones
       # Forward zones
       zone "example.com" {
               type master;
               # The forward zone, as generated by the makefile
               file "master/data/example.com.intzone";
       };
       # Reverse zones
       zone "0.1.2.3.4.5.6.7.8.9.a.b.c.d.e.f.ip6.arpa." {
               type master;
               # The IPv6 reverse zone, generated
               file "master/data/example.com.intrev6";
       };
       zone "0.168.192.in-addr.arpa" {
               type master;
               # The IPv4 reverse zone, generated
               file "master/data/example.com.intrev4";
       };
       ## Define standard zones for recursing clients
       zone "." {
               type hint;
               file "standard/root.hint";
       };
       zone "localhost" {
                type master;
               file "standard/localhost";
       };
       zone "127.in-addr.arpa" {
               type master;
               file "standard/loopback";
       };
       zone "0.0.0.0.0.0.0.0.0.0.0.0.0.0.0.0.0.0.0.0.0.0.0.0.0.0.0.0.0.0.0.ip6.arpa" {
               type master;
               file "standard/loopback6.arpa";
       };
       ## Optionally prevent "Site-Finder" style Verisign indelicacies
       zone "com" { type delegation-only; };
       zone "net" { type delegation-only; };
};
As you can see in the configuration, this view uses the internal zone files -- this means that internal clients will not get the data entered with an "; External" selector, which is what was intended. We also want to define some standard zones such as "localhost." so that the root servers don't get loaded with useless traffic. Finally, you might have noted that we prevent non-recursive queries to be matching this view -- this is done because we want to restrict the second view (see below) to zone transfers, and allow the future slave node to also act as a regular, internal client: when the secondary name server wants to refresh its copy of the (external) zone, it will match the external view, as AXFR queries are not recursive; now if the same machine wants to resolve google.com, it will match the first view, as the query will be recursive. As recursive queries are the default in the vast majority of resolvers, everything will work fine :-)
Configuring the "zone transfer" view
So, now that our internal hosts are merrily resolving, we want the external hosts to be able to get the IP addresses associated with our domain. But, as already stated, we don't want them to be able to query every RR in our domain, and that's why we configured different views in the first place -- so now we'll use the external zone files, as generated by our makefile. The relevant section is outlined below -- remember though that external clients won't be accessing this BIND view directly: only the second nameserver will, and this nameserver will in turn present this data to external hosts.
### This is only for AXFR from secondaries
view "external" IN {
       ## Only secondaries are concerned by this view
       match-clients { slaves; };
       match-destinations { me; };
       # AXFR is not recursive (and shouldn't be)
       match-recursive-only no;
       ## Access control
       # We only need to provide access to zone transfers here
       allow-query { slaves; };
       allow-recursion { none; };
       allow-transfer { slaves; };
       ## Master zones
       # Forward zones
       zone "example.com" {
               type master;
               # The external forward zone, as generated by the makefile
               file "master/data/example.com.extzone";
       };
       # Reverse zones
       zone "0.1.2.3.4.5.6.7.8.9.a.b.c.d.e.f.ip6.arpa." {br />
               type master;
               # The IPv6 reverse zone, generated
               file "master/data/example.com.extrev6";
       };
};
As you can see, the external view does not contain a reverse IPv4 zone, as in this setup the site is not authoritative for it. It does however contain a reverse zone file for the relevant IPv6 block, which will then have to be delegated to, typically at the ISP-level.
Once this setup works correctly, we'll configure the slave server -- which will in turn be a master for external slaves. As we already split the DNS setup into different views, this server won't have much to do: when the external zones are updated, it will receive a NOTIFY, AXFR-query the master server, update its view of the zone data, and eventually NOTIFY external slaves. Due to this limited requirements, the site administrators choose a much lighter server -- this will reduce the load on the external machine, provide faster answers, and improve the security of the bastion host. Cool :-) Let's install NSD, then.
Setting up the external name server -- NSD
Compilation & installation
The process of configuring and installing NSD is straightforward, and may not be necessary on some OSes, as most Linux distributions have this software already packaged -- if you're running Linux, chances are that an apt-get install nsd (or your distribution-specific equivalent) will suffice, and you might then want to skip this section.
However, if you're a never-satisfied control-freak ;-), or you just don't have access to a packaged version, you might want to compile NSD yourself. Here is how:
- Configure: NSD is using GNU autoconf, so just running ./configure at the top of your source tree will likely lead to a successful compilation. However, if you want to customise the behaviour of NSD, a ./configure --help will list accepted options to configure -- here is an example used for packaging:
./configure --prefix=/usr --mandir=/usr/share/man --with-configdir=/etc/nsd \
--with-pidfile=/var/run/nsd/nsd.pid --with-zonesfile=/etc/nsd/nsd.zones \
--with-conffile=/etc/nsd/nsdc.conf --with-zonesdir=/srv/nsd --with-dbfile=/srv/nsd/nsd.db \
--disable-plugins --enable-dnssec --enable-tsig --enable-bind8-stats \
--with-libwrap --with-ssl --with-user=nsd
- Compilation: once configured, just type make and wait for the compilation process to finish. If you're getting some errors about missing headers and/or libraries, you'll have to specify the location of libwrap (which is included in most OSes now, but is from Wietse Venema) and/or OpenSSL in your invocation of configure. Refer to the docs at these URLs if you have to install the libraries yourself.
- Installation: as there is (yet?) no regression tests target, type make install to install your shiny new NSD server and associated utilities -- now is time for configuration.
Configuration
NSD has been designed from the ground up to be a lightweight name server : many features that are commonly found in DNS server software are not included in the daemon itself. For example, you'll have to compile your zone files before the server can use them. Some of the inconveniences in previous versions of NSD have however been resolved as of version 3.0.6: NSD will now handle NOTIFYs if configured to do so, and will even send them -- note that you'll still have to dump zone modifications to disk explicitly, as explained below.
To configure and run NSD, you'll have to do the following, as explained in the README file in the distribution -- the info below is valid for a 3.0.6 version:
- Customize your configuration file:
- nsd.conf is the main configuration file -- actually, it's supposed to be the only one, but I prefer to keep a separate configuration file for my zones and to 'include:' it here -- YMMV. The syntax is quite simple, and is detailed in nsd.conf(5). Some important things to look for are the 'chroot:' and 'user:' attributes.
- nsd.zones is where I tell NSD which zones it authoritative for -- the syntax is quite simple, and I'm sure you'll find your way into it. The important things to remember is to allow potential master servers to send NOTIFYs, and to allow slaves to AXFR/IXFR-query the server.
- Run nsdc rebuild to build your zone file -- yes, we've already written a zone file, but it has to be validated and compiled into a form which is understandable by the server. This invokes zonec, which is the zone compiler bundled with NSD
- Run nsdc start to start the server, and check that it is running with nsdc running
- If your server is a slave for some zones, you might want to configure a cron job to dump zone modifications to disk regularly (e.g. daily). You do this by invoking nsdc patch
As the above might have been a bit too theoretical, here's an example of an nsd.zones file:
#
# nsd.zones -- a list of the zones to be compiled into the NSD database
#
# A master zone
zone:
       name: "example.org."
       zonefile: "/srv/nsd/master/example.org.zone"
       # Notify slaves and allow them to AXFR-query us
       notify: 2.3.4.5 NOKEY
       provide-xfr: 2.3.4.5 NOKEY
# A slave zone
zone:
       name: "example.com."
       zonefile: "/srv/nsd/slave/example.com.zone"
       # Query the master for updates; accept notifies
       allow-notify: 1.2.3.4 NOKEY
       request-xfr: 1.2.3.4 NOKEY
Once everything is running as expected, we can think about adding some security to the DNS setup, and that's what we'll do in the next section -- and if you were curious about the "NOKEY" parameter in the previous listing, it will be explained there. See :-)
Securing the zone transfers
To secure the zone transfer, we will use TSIG, as defined in RFC 8945. TSIG provides data origin authentication and integrity protection at the protocol level, and is very well suited for our purposes: in opposition to DNSSEC, it uses a symmetric-key cryptosystem (for a light introduction to symmetric- vs. dissymmetric-key based cryptosystems, you might want to check my PKI overview page), and is therefore much lighter; additionally, it is well supported by BIND and NSD.
Configuring TSIG between a master and a slave server requires the following three steps:
- Generate a shared secret key -- to do this, we'll only need a bunch of random bits and a base64 encoder, e.g. OpenSSL. As recommended in RFC 8945, we'll use a key size of at least 16 bytes, which could for example be generated by the following command:
$ dd if=/dev/urandom bs=16 count=1 2>/dev/null | openssl base64
Once generated, you'll have to give the key a unique name -- a good pattern for this is <id>.<master>.<slave>, e.g. 01.master.example.com.slave1.example.com.
- Configuring BIND -- this step requires you to define a "key" statement corresponding to the generated key in your named.conf, and then declaring the servers for which you which to use the key, for example:
#
# TSIG
#
key 01.master.example.com.slave1.example.com. {
       algorithm hmac-md5;
       secret "/Qm2op3VoKEntXBZyYdlBA==";
};

server 192.168.2.1 {
       keys { 01.master.example.com.slave1.example.com.; };
};
- Configuring NSD -- this used to be a bit less intuitive, but is not anymore as of version 3 -- simply include a 'key:' clause in your configuration file, as shown below:
key:
       name: "01.master.example.com.slave1.example.com."
       algorithm: hmac-md5
       secret: "/Qm2op3VoKEntXBZyYdlBA=="
Once this is done, typing nsdc update and nsdc patch should proceed to a TSIG-authenticated zone transfer and dump the changes to disk. You can check the authenticity of the zone by examining the beginning of transferred zone files -- it should contain a line similar to this:
; TSIG verified with key '01.master.example.com.slave1.example.com.'
A final note about the "NOKEY" parameter in your zone declarations: if you have configured BIND to TSIG-authenticate its zone transfers (and you should have by now), then it will also authenticate its NOTIFYs. For NSD to accept those, simply replace the "NOKEY" parameter with the name of the key used for the transfer, and do this *both* for 'allow-notify:' and 'request-xfr:', as NSD won't accept signed NOTIFYs when configured with "NOKEY".
If everything did go well, congratulations! If not, then you might need to read this page once again ;-) -- don't hesitate to pinpoint eventual errors in it, though.