
Note: A 2022 tutorial on the many aspects of IPv6 can be found in this All Things TECH IPv6 in Windows article.
Enabling IPv6
Internet Protocol version 6 (IPv6) is enabled by default in all versions of Microsoft Windows 8 and later, and Server and 10 Enterprise versions released in 2013 or later. No action is required to enable IPv6.
In the absence of applicable policy or guidance about hardening Windows Server to guard against potential IPv6-related attacks, a guide for configuring Windows Server versions released in 2013 or later is provided by this article.
Internet Connection Sharing (ICS) is disabled by default, and should be disabled if found to be enabled on any network interface as described here. Wi-Fi Sense (present in Windows 10 versions 1709 and prior only) should be disabled if present as described therein.
Server versions have a DHCPv6 client enabled by default. This may or may not be considered acceptable. Disabling the DHCPv6 client on server versions is described in Part 3: IPv6 Static Addressing and DNSv6 in the Enabling IPv6 in Microsoft Windows Application Servers article in the Infrastructure section. Depending on the LAN segment router configuration, clients on that LAN segment may need to be reconfigured to use DHCPv6, as described in Part 4: Setting up DHCPv6 to Dynamically Issue IPv6 Addresses in a Network in the Enabling IPv6 in Microsoft Windows Application Servers article in the Infrastructure section.
Running the following cmdlets in PowerShell will disable some vulnerable tunneling interfaces that are enabled by default. Disabling them is not required, but is recommended for better security. The netsh command line interface used to configure and manage TCP/IP configurations still exists, but Microsoft recommends that you transition to Powershell. In future updates of Windows, Microsoft may remove the netsh functionality. It is also possible to disable these vulnerable interfaces using Group Policy Objects (GPO) as described in this article. (The .admx and .adml files available there do not disable IP-HTTPS-based interfaces, but are otherwise current.)
Run PowerShell as an Administrator, and then:
1. Run the cmdlet
Get-NetIPv6Protocol
If the value of RandomizeIdentifiers is anything other than Disabled, run the cmdlet
Set-NetIPv6Protocol –RandomizeIdentifiers Disabled
and if the value of UseTemporaryAddresses is anything other than Disabled, run the cmdlet
Set-NetIPv6Protocol –UseTemporaryAddresses Disabled
2. Run the cmdlet
Get-Net6to4Configuration
This will show the State of 6to4 tunneling. If the State is other than Disabled, run the cmdlet
Set-Net6to4Configuration Disabled
Unless 6to4 tunneling is disabled, any Network Adapter with a public IPv4 address will automatically be assigned a corresponding 6to4 address on the 6to4 tunneling interface, and an attempt will be made to register that 6to4 address in DNS. Use of the 6to4 server (6to4.ipv6.microsoft.com) is not recommended. It is no longer supported by Microsoft.
3. Run the cmdlet
Get-NetIsatapConfiguration
This will show the State of ISATAP tunneling. If the State is other than Disabled, run the cmdlet
Set-NetIsatapConfiguration Disabled
4. Run the cmdlet
Get-NetTeredoConfiguration
This will show the State of Teredo tunneling. If the State is other than Disabled, run the cmdlet
Set-NetTeredoConfiguration Disabled
(It is not recommended that you enable the Teredo protocol, but if for some reason you want to, omit the above cmdlet. You will likely also want to configure your own Teredo server using the cmdlet
Set-NetTeredoConfiguration –ServerName “Teredo.Server.FQDN”
where Teredo.Server.FQDN is the fully qualified domain name of your Teredo server. Use of any default Teredo servers (such as www.ipv6.microsoft.com, teredo.ipv6.microsoft.com, win10.ipv6.microsoft.com, or 1710.ipv6.microsoft.com) supported by Microsoft in the past is not recommended. If the computer you are configuring is also part of a Windows domain, then also run the cmdlet
Set-NetTeredoConfiguration –Type EnterpriseClient
It is generally not recommended to enable Teredo when connected to a Windows domain.)
The cmdlets in 1. delete a temporary randomly-generated global IPv6 address (which is neither useful nor desirable when you have a global IPv6 address assigned by either Stateless Address Autoconfiguration [SLAAC] or Dynamic Host Configuration Protocol version 6 [DHCPv6]). Note that this temporary address won’t be deleted until the next reboot. Whenever a mobile system moves to a different network, or whenever the network the system is connected to is renumbered, the above cmdlets must be rerun.
To verify that the tunneling interfaces were disabled by 2 through 4, run the Get-NetXXXConfiguration cmdlets again, with 6to4, ISATAP, and Teredo substituted for XXX.
Re-enabling IPv6
If you want to re-enable IPv6 after it has been disabled, the following five methods are available. The method used should correspond to the manner in which IPv6 was disabled.
If Windows Server has not already been hardened to guard against potential IPv6-related attacks as mentioned at the beginning of the article, now may be time.
It is also strongly recommended to check the status of Internet Connection Sharing (ICS). ICS is disabled by default, and should be disabled if found to be enabled on any network interface as described here. Wi-Fi Sense (present in Windows 10 versions 1709 and prior only) should be disabled if present, as described here for desktop systems and here for corporate environments.
Method 1. (Traditional method used by all Windows versions.) In the Network Connections folder of the Network and Sharing Center on the Control Panel, obtain properties on all of your connections and adapters and set the check box next to the Internet Protocol version 6 (TCP/IPv6) component in the list under This connection uses the following items. This method can be used to re-enable IPv6 on each network interface and connection, but does not enable IPv6-tunneling interfaces nor the IPv6 loopback interface.
Method 2. Run PowerShell as an Administrator. Run the cmdlet
Get-NetAdapterBinding
to list all Network Adapters on the computer and the state of the ms_tcpip6 ComponentID for each Network Adapter. For each Network Adapter for which the ComponentID ms_tcpip6 shows Enabled = False, run the cmdlet
Set-NetAdapterBinding -Name “Network Adapter Name” –ComponentID ms_tcpip6 –Enabled $True
Method 3. Use either (a) the wizard or (b) follow the directions for modifying the registry in this article on the learn.microsoft.com website. (As noted in that article, after following the directions for modifying the registry, method 1 above can no longer be used to enable IPv6.)
Method 4. Search for the regedit app and Run as Administrator (older than but similar to method 3(b) above.
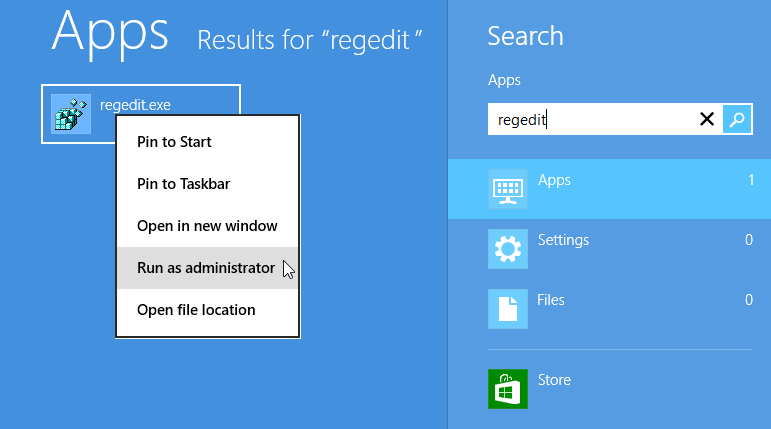
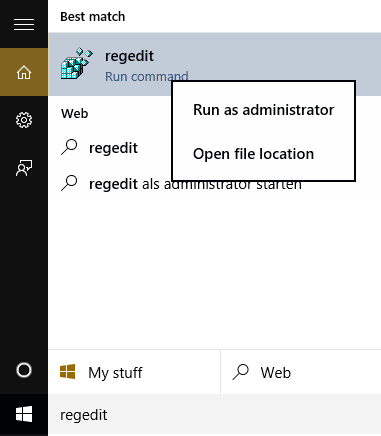
Windows 8 “regedit” search Windows 10, 11 and later "regedit" search
The following registry value (DWORD type) should already exist. If it doesn’t, then create it:
HKEY_LOCAL_MACHINE\SYSTEM\CurrentControlSet\Services\Tcpip6\Parameters\DisabledComponents
DisabledComponents has a value of 0x0 by default. Set it to 0x8F to re-enable IPv6 on all your network interfaces and connections, while still disabling the IPv6 tunneling interfaces. You must restart the computer for this change to take effect.
When DisabledComponents exists and a DisabledComponents bit is set, it overrides any settings established by method 1 and 2. The DisabledComponents registry value is a bit mask that controls the following series of flags, starting with the low order bit (Bit 0):
- Bit 0 Set to 1 to disable all IPv6 tunnel interfaces, including ISATAP, 6to4, and Teredo tunnels. Default value is 0.
- Bit 1 Set to 1 to disable all 6to4-based interfaces. Default value is 0.
- Bit 2 Set to 1 to disable all ISATAP-based interfaces. Default value is 0.
- Bit 3 Set to 1 to disable all Teredo-based interfaces. Default value is 0.
- Bit 4 Set to 1 to disable IPv6 over all non-tunnel interfaces, including LAN interfaces and Point-to-Point Protocol (PPP)-based interfaces. Default value is 0.
- Bit 5 Set to 1 to modify the default prefix policy table to prefer IPv4 to IPv6 when attempting connections. Default value is 0.
- Bit 6 This bit was reserved for future use up until Windows Server 2019. Set to 1 to disable all CP-based interfaces. Default value is Bit 7 Set to 1 to disable all IP-TPS-based interfaces. Default value is 0.
To determine the value of DisabledComponents for a specific set of bits, construct a binary number consisting of the bits and their values in their correct position and convert the resulting number to hexadecimal. For example, if you want to disable 6to4 interfaces, disable Teredo interfaces, and prefer IPv4 to IPv6, you would construct the following binary number: 00101010. When converted to hexadecimal, the value of DisabledComponents is 0×2A.
Method 5. Issue the following command line as an Administrator:
reg add hklm\system\currentcontrolset\services\tcpip6\parameters /v DisabledComponents /t REG_DWORD /d 0x8F
The above registry entry should already exist. If it doesn’t, create it.
It seems so easy to enable Internet Protocol version 6 (IPv6) in Microsoft Windows, and it is, if you don’t mind having vulnerable interfaces installed by default. If you do mind, read on.
These seven topics describe enabling IPv6 in legacy versions of Microsoft Windows:
- Enabling IPv6 in Windows 7 and Server 2008 R2
- Re-enabling IPv6 in Windows 7 and Server 2008 R2
- Enabling IPv6 in Windows Vista and Server 2008
- Re-enabling IPv6 in Windows Vista and Server 2008
- Enabling IPv6 in Windows XP with SP2 or SP3 and Server 2003
- Enabling IPv6 in Windows XP with SP1 or no Service Pack installed (not recommended)
- Enabling IPv6 in Windows 2000 (not recommended)
1. Enabling IPv6 in Windows 7 and Server 2008 R2
Windows 7 and Server 2008 R2 had IPv6 enabled by default. No action is required to enable IPv6. Internet Connection Sharing (ICS) is disabled by default, and should be disabled if found to be enabled on any network interface as described here. They also had a DHCPv6 client enabled by default. This may or may not be considered acceptable. Disabling the DHCPv6 client on server versions is described in Part 3: IPv6 Static Addressing and DNSv6 in the Enabling IPv6 in Microsoft Windows Application Servers article in the Infrastructure section.
The following command lines will disable some vulnerable IPv6 interfaces that are enabled by default. Their use is not required, but is recommended for better security. It is also possible to disable these vulnerable interfaces using Group Policy Objects (GPO) as described in this article. (The .admx and .adml files available there do not disable IP-HTTPS-based interfaces, but are otherwise current.)
       netsh interface ipv6 set global randomizeidentifiers=disabled store=persistent
       netsh interface ipv6 set privacy state=disabled store=persistent
       netsh interface 6to4 set state state=disabled undoonstop=disabled
       netsh interface isatap set state disabled
       netsh interface teredo set state type=disabled
(It is not recommended that you leave the Teredo protocol enabled, but if for some reason you want to, omit that last line. You will likely also want to configure your own Teredo server since the old default Teredo servers configured with a command such as
netsh interface ipv6 set teredo client teredo.ipv6.microsoft.com
are no longer supported by Microsoft. If the computer you are configuring is part of a Windows domain, the command
netsh interface ipv6 set teredo enterpriseclient
is also necessary. It is not recommended to enable Teredo when connected to a Windows domain.)
The first two command lines delete a temporary randomly-generated global IPv6 address Windows creates (but which is neither useful nor desirable when you have a real global IPv6 address). Note that this address won’t be deleted until the next reboot. Whenever a mobile system moves to a different network, or whenever the network the system is connected to is renumbered, these commands must be reentered.
The disabled interfaces will still be displayed by the “ipconfig /all” command line, but their status is disabled. To verify this, run the commands
       netsh interface ipv6 show global
       netsh interface ipv6 show privacy
       netsh interface ipv6 6to4 show state
       netsh interface ipv6 isatap show state
       netsh interface ipv6 show teredo
2. Re-Enabling IPv6 in Windows 7 and Server 2008 R2
If you want to re-enable IPv6 in Windows 7 or Server 2008 R2, the following two methods were provided by Microsoft. These are also documented on the Microsoft web site (look at the Microsoft knowledge base article KB 929852 article for more details). It is also strongly recommended to check the status of ICS and disable it wherever it is enabled, following the guidance provided by the University of Delaware here.
It is possible to re-enable IPv6 after it has been disabled using either of the following two methods (depending on how it was disabled):
- In the Network Connections folder, obtain properties on all of your connections and adapters and set the check box next to the Internet Protocol version 6 (TCP/IPv6) component in the list under This connection uses the following items. This method enables IPv6 on your LAN interfaces and connections, but does not enable IPv6 on tunnel interfaces or the IPv6 loopback interface. Run the netsh commands shown at the end of the 1. Enabling IPv6 in Windows 7 and Server 2008 R2 topic to verify that the vulnerable interfaces are disabled.
-
Set the following registry value (DWORD type) to 0×8F:
HKEY_LOCAL_MACHINE\SYSTEM\CurrentControlSet\Services\Tcpip6\Parameters\DisabledComponents
This method enables IPv6 on all your LAN interfaces, connections, while still disabling the IPv6 tunneling interfaces. You must restart the computer for this registry value to take effect. DisabledComponents is set to 0 by default. Method 1 above may be used to selectively enable/disable IPv6 on individual connections and adapters.
The DisabledComponents registry value is a bit mask that controls the following series of flags, starting with the low order bit (Bit 0):
- Bit 0 Set to 1 to disable all IPv6 tunnel interfaces, including ISATAP, 6to4, and Teredo tunnels. Default value is 0.
- Bit 1 Set to 1 to disable all 6to4-based interfaces. Default value is 0.
- Bit 2 Set to 1 to disable all ISATAP-based interfaces. Default value is 0.
- Bit 3 Set to 1 to disable all Teredo-based interfaces. Default value is 0.
- Bit 4 Set to 1 to disable IPv6 over all non-tunnel interfaces, including LAN interfaces and Point-to-Point Protocol (PPP)-based interfaces. Default value is 0.
- Bit 5 Set to 1 to modify the default prefix policy table to prefer IPv4 to IPv6 when attempting connections. Default value is 0.
- Bit 6 This bit is reserved for future use in Windows Server 2019 and later. Default value is 0.
- Bit 7 Set to 1 to disable all IP-HTTPS-based interfaces. Default value is 0.
To determine the value of DisabledComponents for a specific set of bits, construct a binary number consisting of the bits and their values in their correct position and convert the resulting number to hexadecimal. For example, if you want to disable 6to4 interfaces, disable Teredo interfaces, and prefer IPv4 to IPv6, you would construct the following binary number: 00101010. When converted to hexadecimal, the value of DisabledComponents is 0x2A.
3. Enabling IPv6 in Windows Vista and Server 2008
Windows Vista and Server 2008 had IPv6 enabled by default. No action is required to enable IPv6. They also had DHCPv6 on by default. This may or may not be considered acceptable. The recommendations given in the 1. Enabling IPv6 in Windows 7 and Server 2008 R2 topic apply.
4. Re-Enabling IPv6 in Windows Vista and Server 2008
The methods to re-enable IPv6 are the same as those shown in the 2. Re-enabling IPv6 in Windows 7 and Server 2008 R2 topic above.
Note: When using method 2 in the 2. Re-enabling IPv6 in Windows 7 and Server 2008 R2 topic, bits 7 and 8 are both reserved for future use. Default value is 0.
5. Enabling IPv6 in Windows XP SP2 or SP3 and Server 2003
In XP SP2 or SP3, IPv4 must be installed for IPv6 to work.
In Windows.NET Server 2003 Enterprise, Enterprise x64, Datacenter, Datacenter x64, Standard, Standard x64, Web edition, Compute Cluster Edition R1/R2: all versions. The ipv6 install line shown below is not required but if used will enable IPv6 on all installed network interfaces. The command line
dnscmd /config /EnableIPv6 1
will fully support IPv6 in DNS. NOTE: Although IPv6 is installed by default in Server 2003, it must be explicitly enabled on each network interface. This creates the potential for unintended vulnerabilities at sites that are not IPv6-enabled.
The command lines shown below will enable IPv6, and disable some vulnerable IPv6 interfaces that are enabled by the default install. Before entering these command lines, execute the ipv6 uninstall command line and then reboot to be sure you have a known good initial configuration. It is also strongly recommended to check the status of ICS and disable it wherever it is enabled, following the guidance provided by the University of Delaware here. NOTE: The Microsoft XP help files are mostly left over from XP SP1 and are not a great deal of help for netsh (the preferred way of making network configuration changes in SP2 and SP3) and still talk about the ipv6 command (NOT preferred with SP2 or SP3).
      ipv6 install
      netsh interface ipv6 set privacy state=disabled store=persistent
      netsh interface ipv6 6to4 set state state=disabled undoonstop=disabled
      netsh interface ipv6 isatap set state disabled
      netsh interface ipv6 set state 6over4=disabled v4compat=disabled
      netsh interface ipv6 set teredo disabled
(It is not recommended that you leave the Teredo protocol enabled, but if for some reason you want to, omit that last line. You will likely also want to configure your own Teredo server since the old default Teredo server configured with the command
netsh interface ipv6 set teredo client teredo.ipv6.microsoft.com
is no longer supported by Microsoft. If the computer you are configuring is part of a Windows domain, the command
netsh interface ipv6 set teredo enterpriseclient
is also necessary. It is not recommended to enable Teredo when connected to a Windows domain.)
The second command line deletes a temporary randomly-generated global IPv6 address Windows XP creates (but which is neither useful nor desirable when you have a real global IPv6 address). Note that this address won’t be deleted until the next reboot. Whenever a mobile system moves to a different network, or whenever the network the system is connected to is renumbered, this command must be reentered.
The disabled interfaces will still be displayed by the “ipconfig /all” command line, but their status is disabled. To verify this, run the commands
      netsh interface ipv6 show privacy
      netsh interface ipv6 6to4 show state
      netsh interface ipv6 isatap show state
      netsh interface ipv6 show state
      netsh interface ipv6 show teredo
6. Enabling IPv6 in Windows XP SP1 or no Service Pack installed
The use of IPv6 is not recommended. IPv6 almost worked in Windows XP with SP1, but the Internet Connection Firewall (ICF) that came with SP1 did not protect IPv6, without a lot of work and even then protection had holes. It almost worked in Windows XP with no Service Pack installed.
7. Enabling IPv6 in Windows 2000
The use of IPv6 is not recommended. Windows 2000 with SP4 had a technology preview that could be installed, but it was incomplete and hard to install.
The following documents explain the steps involved in enabling Internet Protocol version 6 (IPv6) on Juniper routers and layer 3 switches, and establishing the IPv6 Access Control Lists (ACLs) to comply with DoD Ports, Protocols, and Services (PPS) policy. You must be running Junos OS 20.3 or higher.
This Routing Policies, Firewall Filters, and Traffic Policers User Guide from Juniper Networks provides beginning and more advanced configuration information for routers running Junos OS. This Ethernet Switching User Guide describes configuring and monitoring switches running Junos OS.
A complete reference with numerous examples and detailed explanation of the configuration options for Juniper routers and Layer-3 switches is available. Go to the Juniper web site and use the Filter by tItle box to search for a topic of interest. Another detailed reference with an emphasis on security configurations in Juniper JUNOS is available in a different part of the Juniper web site. Juniper maintains a searchable Knowledge Base specific to configuration and deployment of its equipment. Configuration information for Dynamic Host Configuration Protocol version 6 (DHCPv6) may be found here.
This webpage provides documents explaining the steps involved in enabling and configuring IPv6 on Extreme Networks hardware.
This webpage provides documents explaining the steps involved in enabling and configuring IPv6 on Extreme Networks software.
Configuration information for Dynamic Host Configuration Protocol version 6 (DHCPv6) may be found here.
To find documentation for a specific Cisco router, go to the Routers page on the Cisco website. Next, scroll down the list to find a specific model number. To find documentation for a specific Cisco layer-3 switch go to the Switches page on the Cisco website. Next, scroll down the list to find a specific model number.
A complete reference with numerous examples and detailed explanations of specific IOS configuration options for all Cisco routers and layer-3 switches is available on the Cisco IOS IPv6 Command Reference page on the Cisco website. An IPv6-specific Frequently Asked Questions (FAQ) file is maintained by Cisco. Cisco maintains a Small Business Support Community for its equipment.
Configuration information for Dynamic Host Configuration Protocol version 6 (DHCPv6) may be found here.